Modelling: An Introduction to the Production of Waxes for Use with Casting
Waxes are created as part of the casting process and understanding their production and uses will benefit you when considering casting for your own work. This article is part of a series on different approaches to modelling and what you need to be aware of.
Today, the jewellery, silversmithing and allied trades are a mixture of traditional hand skills, large- and small-scale manufacturing techniques and varying levels of technology. The latter, which is often seen as the hand-skills nemesis, has been pushing our industry for generations. In today's market, the craftsperson who has a general working knowledge of all and can utilize this understanding to produce a piece in the most time and cost-effective way, is now coming into their own.
Mark Gartrell FIPG is one such craftsman. Having been modelling and sculpting a range of high-quality items for over 50 years Mark has established himself one of the UK's most adaptable workshops with the ability to design, model, cast, silversmith, chase and finish pieces in-house. And it is Mark's ability to be able to analyse each design and successfully select the most relevant processes to use which have allowed Mark to produce a wide range of work.
In this article Mark provides a step by step introduction to the basic process of taking a mould from a master model and waxing in preparation for casting. This will help you to become familiar with the whole process.
“This first casting allows me to produce a set of master patterns which I will keep for future use in case the mould deteriorates.”
Stage 1: Taking a mould from your model
Despite there being various newer technologies available within the goldsmithing industry, the main merit of hand reproduction of casting waxes by injecting into rubber moulds, when bulk production is needed, is that it can outstrip a 3-D printer in speed of delivery.
For illustration of the processes involved I have provided some images of a very old model that I made of a small hippo to be cast as salt and pepper cruets. Image 1 shows the Plasticine master model from which a block silicone rubber mould is taken. Silicone rubber is a catalytic cold curing material requiring neither heat nor pressure in its curing and thus ideal for use with heat sensitive waxes and modelling materials.
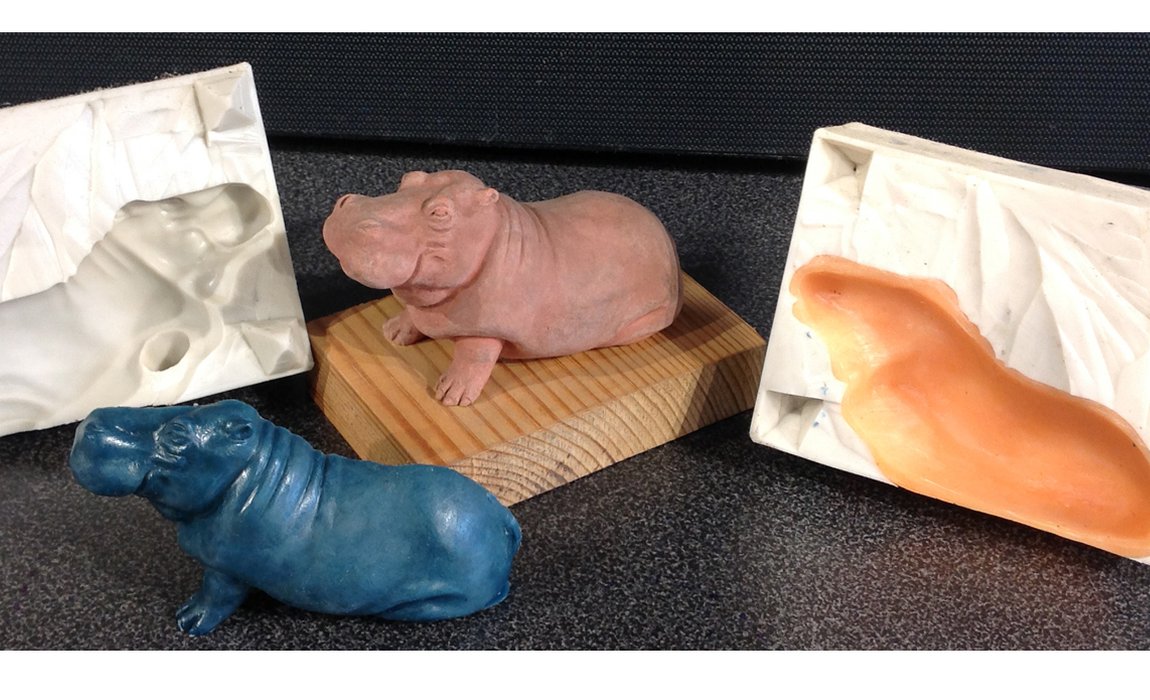 Sculpted Plasticine hippo model (pink), resulting silicone rubber mould with resin filled dental wax (orange) and resulting wax model (blue)
To produce a block silicone rubber from the sculpted model, I first encase this in a box which can be made by folding sheet metal (mild steel, brass, aluminium, nickel etc.) or by screwing together MDF. I then smear the inner surface of the box with a release agent such as petroleum gel and seal all joints with a hot electric needle and wax to make the case leak free.
Silicone is then mixed thoroughly with 5% catalyst (I use a coloured catalyst so that a simple visual check demonstrates a good even mix when the colour is uniform) and I then vacuum the material to remove bubbles that might have been included due to the vigorous mixing. The silicone is then carefully poured into the mould, avoiding inclusions of bubbles and is left to cure for 24 hours.
Stage 2: Cutting the mould
Once cured, the bock rubber is cut in half using a scalpel*. I take the precaution of making location pyramids in the corners so that the mould can be accurately brought back together if needed. I always insert old broken piercing saw blades in the middle of the head and the rump before pouring the silicone into the mould and which protrude as a guide where to cut from and to.
*Whilst it sounds easy, cutting a successful mould is a skilled task which requires practise and specialist cutting tools.
Stage 3: Producing Master patterns form the mould
Waxing now commences and I have a wax filled tea pot which I heat on an electric ring and then dip a small paint brush into. When the brush is coated, I start to paint the inside of the two halves of the mould with the hot wax. This first coat cools quickly and I follow up by painting coat after coat to create the desired thickness for casting by the lost wax method. This first casting allows me to produce a set of master patterns which I will keep for future use in case the mould deteriorates. Casting is something which I used to do myself, but trade casting firms now do this for me, as they will for you.
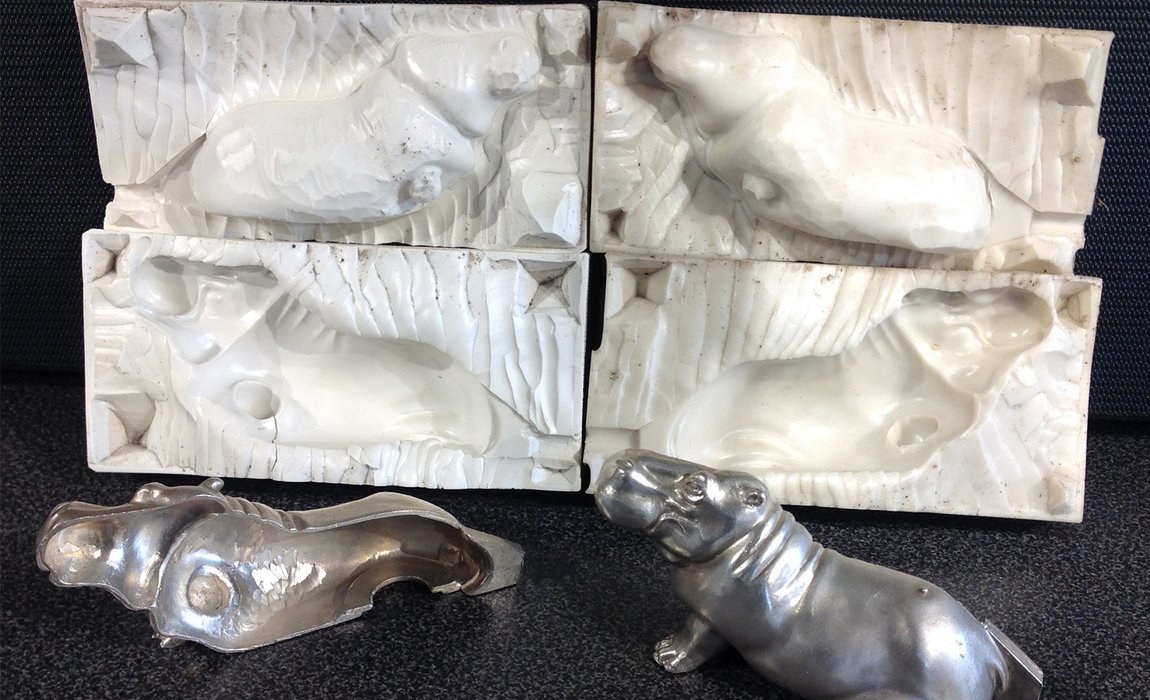 Left and right master castings
This image shows the master castings which are carefully cleaned and polished to create the left and right master patterns.
Stage 4: Producing multiple waxes from the mould
From the master castings I will take a further rubber mould in order to inject waxes for all subsequent hippos. These are again boxed and moulded as described above and cut out with a scalpel and with pyramid locators in all corners. The waxes can be cast separately, or wax welded together, onto a casting tree, and cast as one piece, saving time and money.
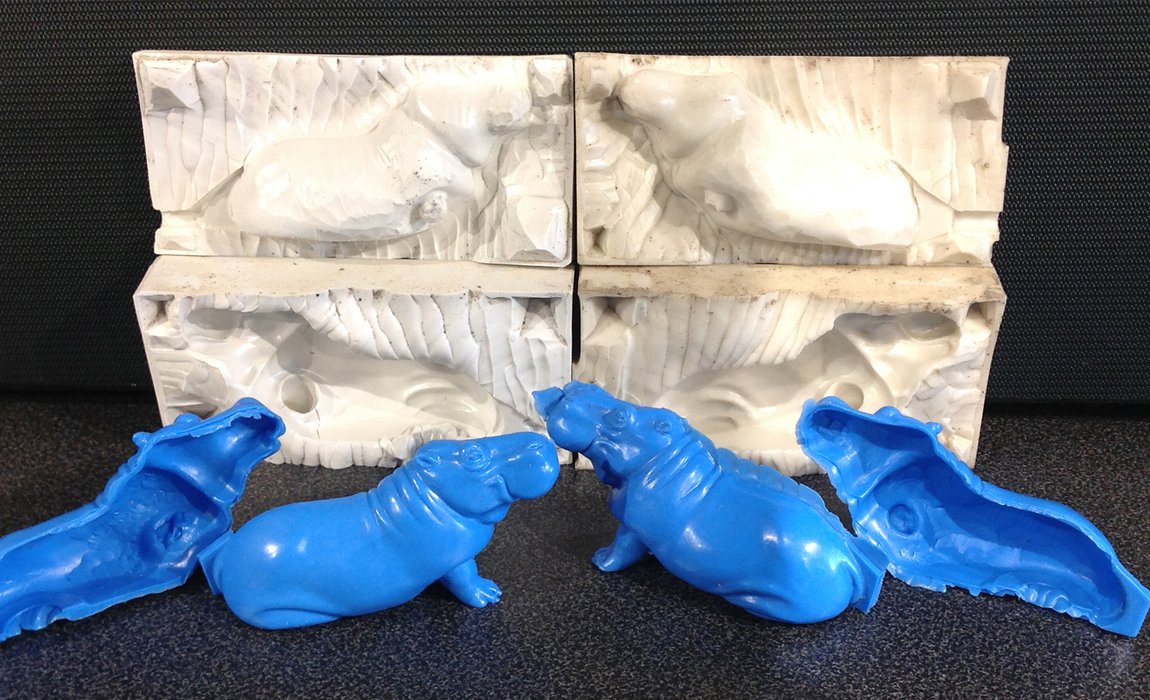 Multiple waxes produced from the secondary mould.
When casting it must be remembered to locate the inner investment core of the hippo with stainless steel pins to prevent the inner core shifting during burn-out and thus making the casting unusable. Stainless steel is used as mild steel corrodes during the casting mould burn-out process at 730 degrees Celsius and, in doing so, splits the mould core thus creating the very defect that we are trying to avoid.
Stage 5: Finishing off
Once the waxes have been cast into precious metal using the lost wax casting method, the castings will finally be soldered, filed, polished and brought to a finished state.
 Final casting alongside multiple waxes
The process described above allows the hippos to be cast using a thinner shell of silver which helps avoid the sometimes granular and porous surface that can be found in thicker silver castings.
Granulation and porosity happen as the surface cools from liquid to solid. The finished hippo sculptures are hollow with a neoprene bung underneath and I drill holes in the snout resulting in a novelty cruet set with which to decorate the dinner table.
Now that we have some knowledge of the basic processes involved in producing waxes, you would benefit from understanding more about the production of master models and patterns from various wax media and why one will be more appropriate than another on certain occasions. See the other articles in the modelling series for further information.
Conclusion and further information
And don't presume that you have to do it all yourself. In increasing your understanding of some of the materials, processes and techniques that I have encountered throughout my career, you are better able to make the right production decisions for yourself and, where required, find the right craftsperson for the job. Good luck!
There are many reputable sources of information relating to the jewellery, silversmithing and allied industries. Whether you are trying to find information on technical skills, processes, materials, makers or inspiration some resources relating to modelling can be found below:
The Goldsmiths’ Company Library relates specifically to gold and silversmithing, jewellery, assaying and hallmarking, precious metals, and the City of London and its guilds. The Library includes 8,000+ books and 15,000+ images, magazines, periodicals and journals, technical guides, films, special research collections, design drawings produced during the early and mid-twentieth century by British or UK-based craftspeople and subject files on a wide range of industry related topics. The Library is also responsible for the Company’s archives, which date back to the 14th century.
Modelling related articles include: